
Robotics is no longer just a futuristic concept—it’s a powerful field that blends creativity, engineering, and problem-solving. Whether you’re a beginner or an engineering student, building your own robotics project can be both exciting and rewarding. With the availability of the best electrical engineering project kits and project kits for mechanical engineering students, getting started has never been easier.
In this guide, we’ll walk you through a step-by-step process to build a robotics project in a simple and practical way.
Why Robotics Projects Matter
Before diving into the steps, it’s important to understand why robotics projects are valuable:
- They improve practical knowledge beyond textbooks
- Help in understanding real-world engineering problems
- Boost innovation and creativity
- Enhance career opportunities in automation, AI, and electronics
For students, especially, using project kits for mechanical engineering students and electrical kits helps bridge the gap between theory and practice.
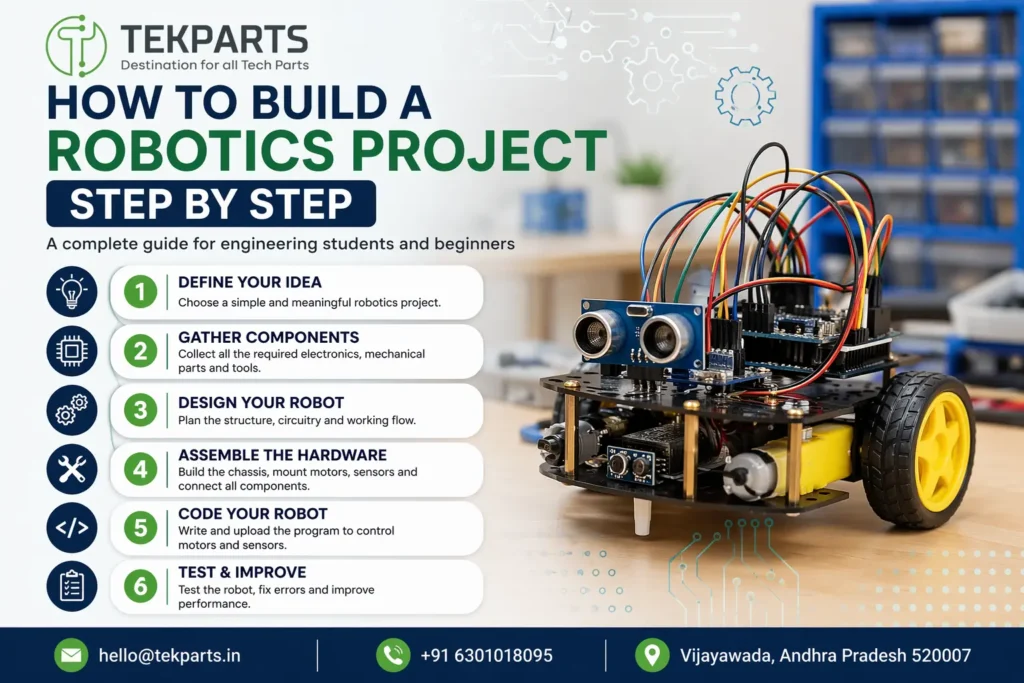
Step 1: Define Your Project Idea
The first step in building a robotics project is choosing the right idea. Start simple if you’re a beginner.
Some beginner-friendly robotics ideas:
- Line-following robot
- Obstacle-avoiding robot
- Bluetooth-controlled car
- Robotic arm
Ask yourself:
- What problem does this robot solve?
- What is the complexity level?
- Do I have the required resources?
If you’re unsure, many best electrical engineering project kits come with pre-designed project ideas, making it easier to start.
Step 2: Gather Components and Tools
Once you finalize your idea, the next step is collecting all the necessary components.
Common robotics components:
- Microcontroller (Arduino, Raspberry Pi)
- Motors and motor drivers
- Sensors (IR, ultrasonic, temperature)
- Power supply (battery)
- Wheels and chassis
- Connecting wires and breadboard
Instead of buying everything separately, you can save time by choosing project kits for mechanical engineering students, which include mechanical parts like chassis, wheels, and frames.
Similarly, best electrical engineering project kits often include microcontrollers, sensors, and wiring essentials.
Step 3: Design the Robot
Design plays a crucial role in the success of your project.
Key design aspects:
- Structure (size, weight, stability)
- Component placement
- Power distribution
- Wiring layout
You can sketch your design on paper or use software tools like CAD for better visualization. Mechanical engineering students benefit greatly from design-focused project kits for mechanical engineering students, as they provide pre-built frameworks.
Step 4: Assemble the Hardware
Now comes the hands-on part—assembling your robot.
Steps to follow:
- Build the chassis (base structure)
- Attach motors and wheels
- Mount sensors in appropriate positions
- Connect the microcontroller
- Arrange wiring properly
Make sure everything is tightly fixed and connections are secure. Loose wiring is one of the most common issues beginners face.
Using the best electrical engineering project kits simplifies this step because components are designed to fit together easily.
Step 5: Write the Program (Coding)
Coding is what brings your robot to life.
Common programming platforms:
- Arduino IDE
- Python (for Raspberry Pi)
Basic coding steps:
- Define input/output pins
- Write logic based on sensor data
- Control motor movements
- Upload the program to the microcontroller
For example, in an obstacle-avoiding robot:
- If the sensor detects an obstacle → stop → turn → move forward
Most best electrical engineering project kits include sample codes, which are extremely helpful for beginners.
Step 6: Test Your Robot
Testing is a critical phase. Don’t expect your robot to work perfectly on the first try.
Testing checklist:
- Are all components powered correctly?
- Are sensors detecting accurately?
- Is the robot moving as expected?
- Is the code functioning properly?
Run multiple tests and observe behavior carefully. Debug errors step by step.
Step 7: Troubleshooting and Improvements
Every robotics project will face some issues. That’s part of the learning process.
Common problems:
- Loose connections
- Incorrect coding logic
- Sensor misalignment
- Power supply issues
How to improve:
- Optimize code for better performance
- Upgrade sensors for accuracy
- Improve mechanical design
- Add extra features (remote control, automation, etc.)
Advanced project kits for mechanical engineering students allow easy modifications and upgrades, making experimentation more flexible.
Step 8: Document Your Project
Documentation is often overlooked but extremely important.
Include:
- Project objective
- Components used
- Circuit diagram
- Code explanation
- Working principle
- Challenges faced
This is especially useful for academic submissions and presentations.
Step 9: Showcase Your Work
Once your robot is ready, share it!
Ways to showcase:
- College exhibitions
- Science fairs
- YouTube demonstrations
- Portfolio websites
Projects built using the best electrical engineering project kits often look more professional, helping you stand out.
Tips for Beginners
Here are some practical tips to make your robotics journey smoother:
- Start small, then scale up
- Learn basic electronics and programming
- Use reliable project kits
- Watch tutorials and read guides
- Don’t be afraid to fail—it’s part of learning
Choosing the Right Project Kits
Selecting the right kit can make a huge difference in your learning experience.
Look for:
- Quality components
- Easy-to-follow instructions
- Reusability
- Compatibility with multiple projects
The best electrical engineering project kits are ideal for understanding circuits and programming, while project kits for mechanical engineering students focus more on structure and movement.
Conclusion
Building a robotics project step by step is an incredible learning experience that combines theory with real-world application. From selecting an idea to assembling components, coding, and testing, every stage teaches valuable skills.
With the help of the best electrical engineering project kits and project kits for mechanical engineering students, even beginners can confidently create functional and innovative robots.
If you stay consistent, keep experimenting, and continue learning, robotics can open doors to exciting career opportunities in technology and engineering.
